| PFTrack Documentation | Node Reference |
User Track
Creating trackers | Adjusting trackers | Tracking window | Search area | Keyframes | Tracker visibility | Tracking controls |Fetching upstream trackers for editing | Trackers | Controls | Tracking errors | Tracker motion | Coverage | Clip controls |
Display controls | Example ASCII tracker text file
The User Track node can be used to manually generate trackers to use for camera or object solving downstream using the Camera Solver, Survey Solver, Object Solver, Mocap Solver, or Target Camera Solver nodes, and can have multiple inputs and outputs.
Trackers can be placed in multiple clips at the same time, enabling multiple cameras or helper frames to be solved simultaneously downstream in the Camera Solver node.
All trackers generated by a single User Track node are placed into a single tracking group named after the node. This group will be referred to downstream in the solver nodes where you select which tracker groups should be used to solve. To change the group name, rename the User Track node on the Workpage.
Creating trackers
To create new tracking points, click the Create button and then click with the left mouse button in the Cinema window. Each click of the mouse button will place a new tracking point at that location.
Trackers should be placed on significant image features such as corners or tracking markers. The more distinct the image feature is compared to the surrounding area, the more easily the feature can be tracked. As new trackers are created, they will be added to the trackers list.
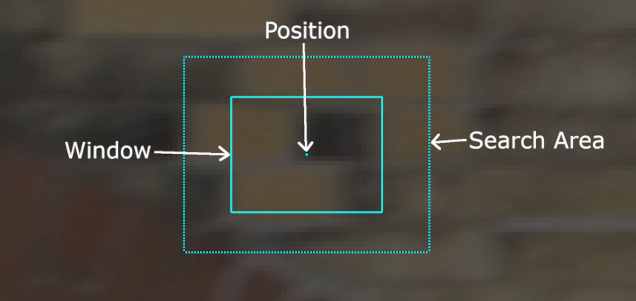
Each tracker has its own set of tracking parameters. Tracking tools for the selected tracker are also visible in the Cinema window:
The tracker position must correspond to a fixed location in 3D space that will be estimated by the solver algorithms when tracking a camera or object.
Trackers also have a rectangular window that contains the image data to be tracked between frames, and a rectangular search area that shows the area that will be examined to find the tracker position in the next frame. The search area is drawn with a black stippled line:
Adjusting trackers
To adjust the position of a tracker after it has been created, first make sure the tracker is selected by clicking with the left mouse button in the Cinema window (or click on the tracking point in the trackers list).
With the tracker selected, click and drag with the left mouse button to adjust the position of the tracker:

Clicking and dragging inside the window or search area will move the entire tracker. The size of the window (or search area) can also be adjusted by moving an edge or corner.
The Alt/Option keyboard modifier can be held to ensure only the tracker position is changed, regardless of the mouse position. This behaviour can be reversed in the User Preferences window if desired, so the modifier must be held to make any changes to the window or search area.
The size of both the tracking window and search area can significantly affect the accuracy of feature tracking, and may need adjusting individually for each tracking point to get the best results.
When creating or editing trackers, the path that the tracker will take during tracking can be previewed dynamically by clicking the Preview Track button.
Tips: You may find it easier to adjust tracker positions after you have finished creating the trackers and switched off the Create button.
If your shot has a bright background, click the Darken button in the Cinema window to reduce the image brightness and make it easier to see your trackers.
X and Y position curves for each tracker are available in the Curve Editor.
Tracking window
When a point is tracked from one from to the next, PFTrack will attempt to find the location of all pixels inside the tracking window in the next frame.
This means the tracking window must be large enough to contain enough pixels to help uniquely locate the tracking point. If the window is too small, PFTack will not be able to accurately identify where the pixels have moved and the tracking point may jump around incorrectly or tracking may fail entirely.
Equally, if the tracking window is too large, locating the exact tracking point may be difficult because too many pixels inside the window are moving differently from the point. This may cause the location of the tracking point to drift when tracked over multiple frames.
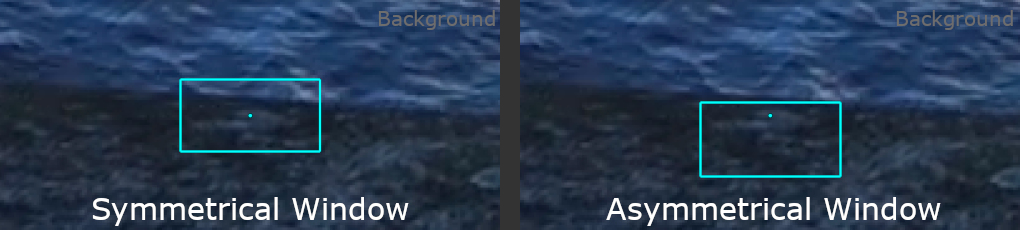
The tracking window should also be positioned with care when there are multiple different motions near the tracking point. By default, all adjustments to the window or search area size are symmetrical. In some cases, it can help to adjust the tracking window size asymmetrically to ensure all the pixels inside the window are undergoing similar motion. To achieve this, hold the Ctrl key whilst adjusting one edge or corner of the window.
This example shows a point being tracked on the edge of an object with moving water in the background. In this case, the symmetrical window is covering part of the background which may introduce errors. By adjusting the window asymmetrically, it is positioned entirely over the foreground object which will improve tracking accuracy:
The entire tracking window can also be offset from the tracking point if required, by holding the Ctrl modifier whilst moving the tracker position. This can be used to keep a tracking point one location whilst temporarily using a different part of the image to track its determine the tracker motion.
Search area
The search area defines the possible locations that will be examined to locate the tracking point in the next frame. If the point moves outside the search area it cannot be tracked accurately.
If tracking fails where the camera or object being tracked is moving quickly, make sure to check the search area is large enough to encompass the tracking point location in the next frame.
Equally, if the search area is too large and many different points exist in the next frame that look very similar to the point being tracked, the tracker may jump to the wrong point. If this happens, reduce the size of the search area and track the point again.
Note: The search area can sometimes be smaller than the tracking window if the motion of the point from frame-to-frame is very small.
Keyframes
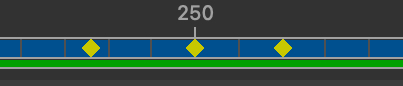
When a tracker is manually positioned in a frame, a Manual Keyframe is generated. Manual Keyframes are displayed as yellow diamonds in the scrub bar:
Manual Keyframes can be created at any frame by manually positioning the tracker, for example whenever a tracker comes back into view if it has been occluded by another object or moved out of frame.
When a tracker is tracked into a new frame, a Tracked Keyframe is generated. Tracked keyframes are displayed in the scrub bar with a blue background.
Tracker visibility
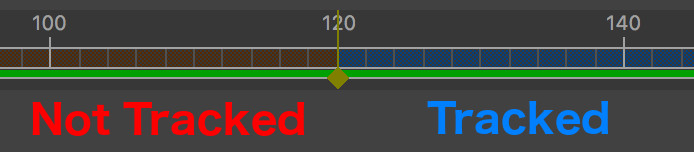
The range of frames in which the selected tracker is visible is shown in the scrub bar as either a red, blue or grey colour for each frame, depending on whether the tracker has been tracked/positioned in that frame or not.
The following image illustrated this, where a tracker was manually placed at frame 50 and then tracked backwards. The tracker is still visible in later frames and has not been tracked:
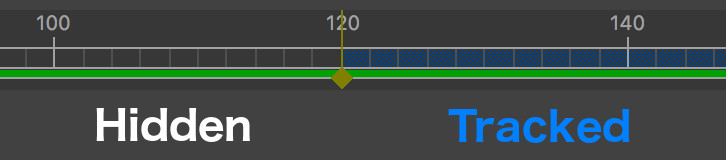
If a tracker had not been tracked or positioned in a frame, its location will be interpolated from nearby keyframe. Trackers should be hidden from view when the image feature they are tracking either leaves the frame or becomes occluded by another object. This is achieved using the Hide buttons described in the Tracking Controls. In this example, because the point being tracked was occluded after frame 50, the tracker is hidden from view:
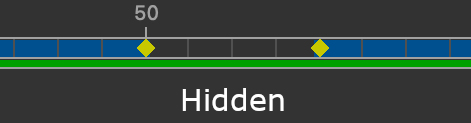
Once a tracker comes back into view, create a keyframe at that point so you can track throughout the remainder of the clip more easily:
Tracker visibility can also be checked in the Coverage panel described below. The colours used to represent tracked and untracked frames can be changed if desired in the User Preferences window.
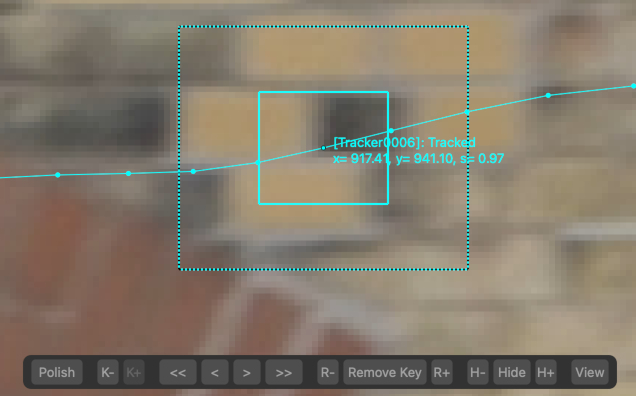
Tracking controls
When a tracker is selected, the Tracking Controls are displayed in the Cinema window. These can be used to track points forwards and backwards through multiple frames, as well as adjusting tracker visibility:

K-, K+: These buttons move to the previous or next keyframe.
<<, <, >, >>: These button are used to track selected trackers forwards or backwards through the clip. The << or >> buttons track continuously until the start or end of the clip is reached (provided the tracker matching score does not drop below the failure threshold). The < and > buttons will track by one frame at a time.
R-, Remove, R+: Remove manual and tracked keyframes from the tracker. The R- button removes all manual or tracked keyframes from earlier frames, and R+ removes from later frames. The Remove button removes only the current manual or tracked keyframe. Note that removing keyframes does not hide the tracker in the frame.
H-, Hide, H+: Hide a tracker from frames so it is not visible and no longer contributes to a camera solve. This is necessary when a tracker is occluded by another moving object, or when the tracker moves out of the image. The Hide hides the tracker in the current frame. The H- and H+ buttons removes a tracker from all earlier or later frames, up to the point where a manual keyframe has been positioned.
Polish: The Polish button can be used to quickly re-track the point forwards and backwards over a small range of frames.
View:: Click the View button to zoom in to the selected tracker in the current frame. Use the Centre View button in the Display Controls to keep the tracking point centred when changing frame.
When tracking a point through multiple frames, click the Stop button (or press the Esc key) to stop tracking.
Polishing trackers
Clicking the Polish button will re-track the point forwards and backwards over a small range of frames defined by the Polish range parameter. This can be used to smooth out jumps in trackers when they are re-positioned manually after drifting out of alignment. The new tracking positions that are generated will be blended with the previous tracking positions according to distance from the current frame. Frames that are very close to the current frame will mainly be influenced by the new tracking position, whilst frames that are far away (i.e. those at the extremities of the polish range) will be less affected and retain more of their original track position. Polishing will not overwrite manually placed keyframes.
Fetching upstream trackers for editing
Trackers can be fetched from upstream nodes such as the Auto Track node for editing by clicking the Fetch button and selecting one or more trackers in the Cinema window by clicking with the left mouse button. If the Shift button is held whilst clicking the Fetch button, all trackers will be displayed in a list by name and can be fetched from there.
When fetching trackers by clicking in the Cinema window, all trackers visible in the current frame will be displayed in white. Clicking on a tracker with the left mouse button to fetch the tracker into the User Track node for editing. This will create a new tracker in the list and coloring it yellow in the Cinema window for clarity.
Multiple trackers can be fetched at the same time using a marquee by clicking and dragging with the left mouse button to draw a selection rectangle, or by holding the Shift key to draw a selection lasso.
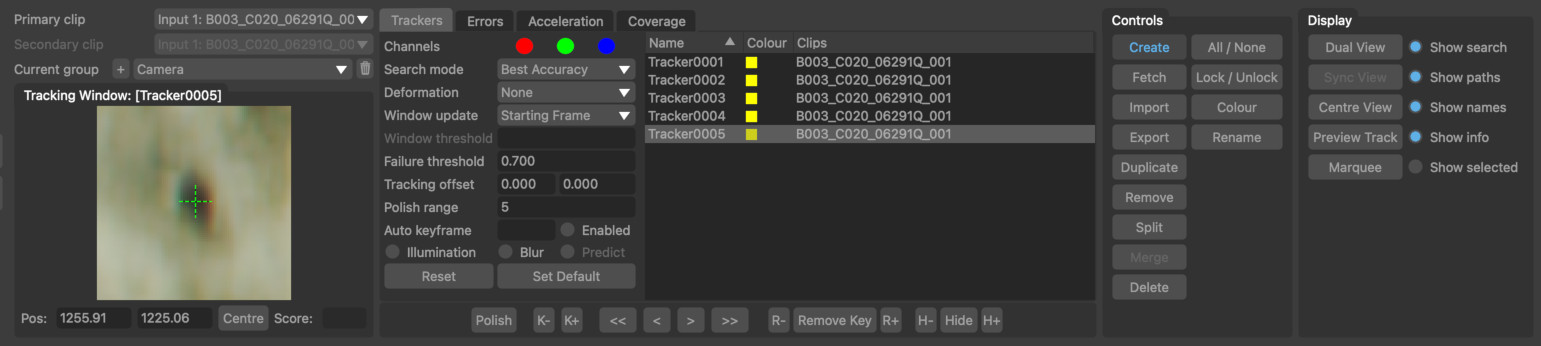
Trackers
![]()
The trackers list contains all trackers that have been generated, along with their window colour and the clips in which they have been positioned. The list can be ordered by clicking on a column header. Trackers can be selected by clicking in the list with the left mouse button. Selected trackers are also highlighted in the Cinema window.
Trackers can be renamed by double-clicking in the Name column. Double-clicking in the colour column will display a colour selection window. The selected tracker can also be changed using the Up or Down cursor keys.
Tracking Parameters
Channels: The image channels used to match reference patterns. If one or more channels contains significant noise, or does not contain any useful pixel information, disabling these channels can often improve the accuracy of tracking.
Search mode: The algorithm used to perform tracking. The default value is Best Accuracy, which searches over the search window to find the most likely match for the reference pattern, but changing this to Best Speed will mean that tracking is faster but may be less accurate.
Deformation: The deformation of the pattern windows over time during tracking. By enabling Rotate, Scale and/or Skew, tracking windows can warp and deform in order to better match the reference pattern. This will slightly increase the time it takes to track, but can often mean that trackers exist for longer before their matching score drops below the failure threshold.
Window update: The frequency of reference pattern updates during tracking. The default value, Starting Frame, means the reference window is updated at the frame where tracking starts (i.e. the frame where one of the <<, <, >, >> tracking buttons are pressed). Changing this to Every Frame cause the reference pattern to be updated after every frame is tracked. This may result in a feature tracking for longer before its matching score drops below the failure threshold, but could also result in feature drift as small errors accumulate over time. The final option, Above Threshold, will only update the reference window in frames where the matching score is above the Window threshold parameter.
Tracking Thresholds
Window threshold: The minimum matching score that a tracker can have before its reference window is updated when Window update mode is set to Above Threshold. If a tracker's matching score is below this value, the reference window will be not be updated.
Failure threshold: The minimum matching score allowable before tracking is terminated. During tracking, a tracker will be rejected if its matching score falls below this value. The matching score for a tracker is displayed in the tracking window.
Tracking Adjustments
Tracking offset: The X and Y offset the tracking window from the actual location of the tracker. This is useful in situations where a tracker may be partially obscured, but an nearby area of the image that exhibits the same motion can be found to track instead. By offsetting the tracking window, motion from this nearby area can be used to update the tracker position. The tracking offset can be adjusted interactively in the Cinema window by holding down the Ctrl key whilst moving the tracker using the left mouse button.
Polish range: The number of frames on either side of the current frame that are used to polish a tracker path after a small adjustment.
Auto keyframe: When enabled, keyframes will be created automatically every N frames whilst tracking. To enable auto-keyframing, click the Enabled button.
Illumination: When enabled, local image brightness will be taken into account when tracking, so effects such as flicker or lighting changes do not reduce the overall matching score as much.
Blur: When enabled, image data will be blurred slightly before tracking. This has the benefit of limiting the effect that image noise can have on reducing the overall matching score.
Predict: This option is only available when camera metadata describing approximate camera motion is present. When enabled, this approximate motion will be used to predict how the tracker moves from frame-to-frame to assist with the tracking process.
Default parameters
Reset: Reset the tracking parameters back to the current default values.
Set Default: Save the current tracking parameters use them as default values for newly created trackers. This can be used to avoid the need to define the same tracking parameters individually for each tracker. If the Shift key is held whilst clicking the Set Default button, the current tracking parameters will be stored in an XML preset file and will be used as default values for all future User Track nodes.
The preset file will be stored in the user's directory and will be automatically loaded when new User Track nodes are created. If the preset is no longer needed the XML file can be deleted from the directory to remove it from the application.
Controls
Create: Create a new tracker at the mouse position by clicking in the Cinema window, provided the mouse is not hovering over an existing tracker. By default, new trackers exist throughout the entire clip.
Fetch: Display all upstream trackers that are being piped into this node, allowing trackers to be copied from up-stream for editing. This is useful in situations where an automatically generated tracker needs to be tracked manually into more frames or edited in some other way, or when footage has been replaced and trackers must be extended into new frames. Trackers are displayed in the Cinema windod by default, although this can be changed to display all trackers by name in a list if the Shift button is held whilst clicking the button.
Import: Display a file browser allowing an ASCII text file containing tracker locations to be imported. An example ASCII text file is given at the bottom of this page.
Export: Display a file browser allowing an ASCII text file containing tracker locations to be exported. An example ASCII text file is given at the bottom of this page.
Duplicate: Duplicate the currently selected tracker.
Remove: Remove selected trackers from the current clip but not delete them entirely.
Split: Split the selected tracker into two at the current frame. The selected tracker will be terminated at the previous frame, and a new tracker will be generated covering frames from the current frame to the out frame. This can be used in cases where a tracker jumps between two valid feature points to create two separate trackers, each covering a feature point before and after the jump.
Merge: Merge all selected trackers together into a single tracker. For trackers that exist in the same frame, their positions will be averaged during the merging process.
Delete: Delete all selected trackers entirely.
All/None: Select either all or none of the trackers, depending on how many of the trackers are currently selected.
Lock/Unlock: Lock or unlock selected trackers. Locked trackers cannot be adjusted or edited in any way.
Colour: Display a popup window allowing the colour of all selected trackers to be changed at the same time.
Rename: Display a popup window allowing all selected trackers to be renamed at the same time. Trackers will be numbered sequentially starting at 1 using the new name entered in the popup window.
Tracking window controls
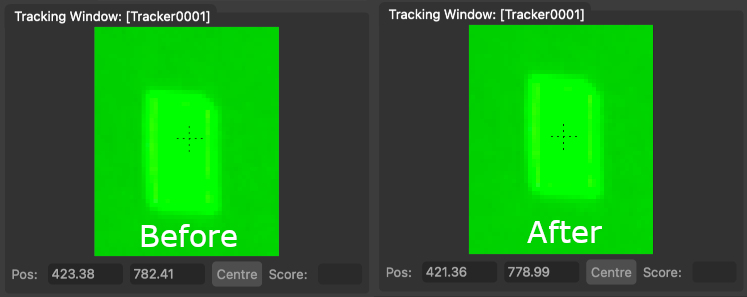
The Tracking Window controls display the image pattern for the selected tracker, along with the current x and y tracker position and matching score. A matching score of 1.0 indicates a perfect match of the tracker's reference pattern and the pattern in the current frame.
Tracker positions can be adjusted interactively in this window by clicking and dragging with the left mouse button. Holding the Ctrl key will reduce the adjustment by 10x, provide finer-grain control over the tracker position.
The Centre button will centre the current tracker around a significant tracking marker. The tracking marker should be positioned entirely within the window, not touching the outer edge. Clicking the Centre button will reposition the tracking point closer to the centre of the marker. This can operate with a variety of different tracking marker types, and will attempt to place the tracking point at the marker's centre-of-mass:
Nudge keyboard shortcuts
Holding down the Alt/Option modifier key while pressing the Left Right Up Down cursor keys will nudge the tracker position 1 pixel in a direction
Additional keyboard shortcuts are available to provide finer-grain adjustments (Ctrl + Alt/Option) modifier keys by default). This reduces the adjustment by a scale factor (0.25 by default) which can be changed in the preferences.
Tracking errors
![]()
The Tracking Errors graph plots the tracking error (measured in pixels) for each tracker in each frame, along with the average tracking error for all trackers visible in a frame. The tracking error is 0.0 when the matching score for a tracker is 1.0, indicating a perfect match. Selected trackers are shown in yellow, and unselected trackers are shown in blue. The average tracking error graph is shown in white.
The error graph can be translated and scaled by clicking and dragging with the right or middle mouse buttons.
Individual trackers can be selected from the graph by clicking with the left mouse button. When a tracker is selected, the current frame will change to match the frame number that was clicked in the graph. If the Centre View display option is also enabled, the Cinema window will be panned to display the tracker location in the centre.
All: When enabled, error graphs will be shown for all trackers, otherwise a graph will only be shown for selected trackers.
 : Click the Fit Area button and drag with the left mouse button in the graph to draw a rectangle, and fit the graph viewpoint to that area.
 : Click the Fit button to scale and translate the error graph so all graphs are visible.
Tracker motion
The motion graph displays plots for the horizontal and vertical motion of each tracker in each frame. The graph can display either tracker velocity or acceleration by selecting the appropriate option from the menu below the graph.
This can be used to identify frames where a tracker jumps incorrectly from one location to another by looking at the difference between the acceleration of one tracker and the others.
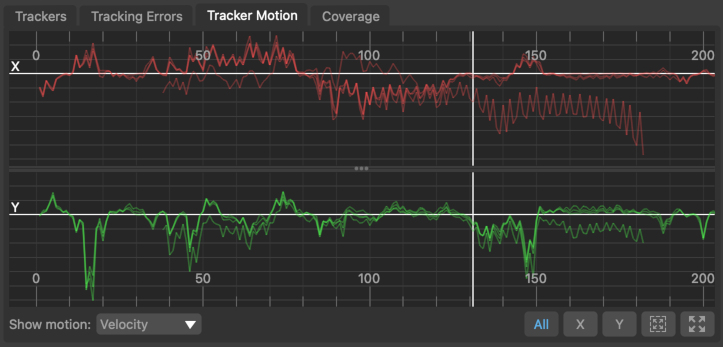
The velocity and acceleration graphs can be used to help quickly identify trackers that are moving differently compared to the rest of the image. For example, this may be because the trackers exists on an object that is moving independently from the camera, or it may be because the tracker is positioned on a false corner, or on another point that cannot be tracked accurately. These situations will be shown as jumps and sharp changes in the velocity or acceleration of the tracker.
Horizontal motion is shown in the upper graph in red, and vertical motion is shown in the lower graph in green. The motion of any selected trackers is shown in blue.
Below the graph is a menu that can be used to switch between displaying tracker velocity or acceleration.
 : Click the X button to display the horizontal tracker motion graph only. Click again to show both the horizontal and vertical graphs.
 : Click the Y button to display the vertical tracker motion graph only. Click again to show both the horizontal and vertical graphs.
 : Click the Fit to area button and draw a rectangle in the graph using the left mouse button to zoom-in on a particular area of the graph.
 : Click the Fit button to fit the graph viewport to show all tracking points and frames.
Mouse controls
To pan the graph horizontally, click and drag with the Right mouse button. To zoom, click and drag with the Middle mouse button (these buttons can be changed in the User Preferences window). The graphs can be panned or zoomed both horizontally and vertically by dragging the mouse in the appropriate direction.
Alternatively, the mouse wheel can be used to zoom as well if desired. Scrolling the wheel will zoom the graph horizontally. To zoom vertically, hold the Alt/Option key whilst scrolling the wheel.
Individual trackers can be selected from the graph by clicking with the left mouse button. When a tracker is selected, the current frame will change to match the frame number that was clicked in the graph. If the Centre View display option is also enabled, the Cinema window will be adjusted to display the tracker location in the centre.
Coverage
The Coverage Panel displays information about the frames in which each tracking point has been tracked:
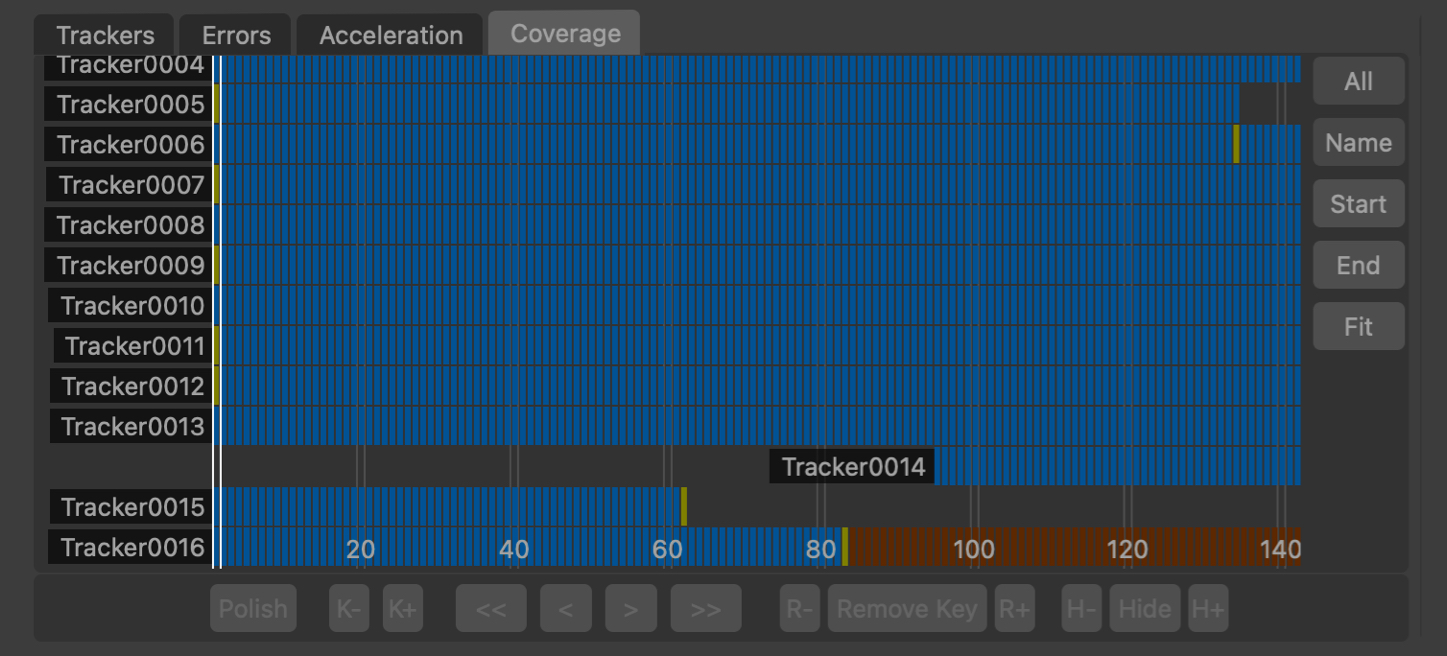
This can be used to evaluate how well tracking points are distributed throughout the clip, which will help to provide an accurate camera solve without any jumps in the camera path.
The Coverage Panel displays each tracker as a horizontal chart, illustrating the frames in which each tracker is visible. The current frame is displayed using white vertical lines.
Each frame in which the tracker is present is indicated by a blue square. Yellow squares indicate frames in which the tracker has been manually positioned rather than tracked.
Frames in which the tracker is visible but has not been positioned are displayed in dark red. It is important to ensure that tracking points have been positioned in all frames in which they are visible, as this can significantly affect the accuracy of the camera solve.
Clicking on an indicator will select the tracking point and display that frame in the Cinema window. Holding the Ctrl key will allow multiple tracking points to be selected.
The panel can be panned horizontally or vertically by clicking and dragging with the right mouse button. Clicking and dragging with the middle mouse button will zoom either horizontally or vertically to increase the number of tracking points and frames that are displayed in the panel.
The mouse wheel can also be used to zoom horizontally, or vertically if the Alt/Option key is held.
Additional controls are also available:
All: Switch between displaying all trackers, or only those trackers visible in the current frame.
Name: Sort the tracking points by name, in alphabetical order.
Start: Sort the tracking points according to the first frame in which they are tracked.
End: Sort the tracking points according to the last frame in which they are tracked.
 : Fit the tracking points display to the window. This will zoom in or out as necessary, displaying as many tracking points and frames as will fit in the viewport.
Clip controls
Primary clip: The primary clip in situations where more than one input has been added to the User Track node. Positioning a tracker in multiple clips allows cameras for all clips to be solved using that tracker, ensuring that cameras are all positioned correctly relative to each other in the scene.
Reference clip: The reference clip in situations where more than one input has been added to the User Track node, and the Reference View button has been enabled to help tracker placement.
Reference View: Split the Cinema window in two, allowing difference clips to be displayed in the left and right halves (referred to as the Primary and Secondary Clips respectively). Each half of the Cinema window can be panned or zoomed independently.
Sync View: Synchronise the secondary clip frame number to the primary clip, when Reference View is enabled. When Reference View is not enabled, the Secondary Clip frame number can only be changed by holding the Alt/Option key whilst clicking and dragging with the left mouse button in the right-hand half of the Cinema window.
Display controls
Preview Track: When enabled, a preview of how a feature will track is displayed in the Cinema window for ten frames on either side of the current frame. As a tracker is positioned in the image window, the preview track will update dynamically to show the tracker path that will be generated. Tracker paths are colour coded according to the matching score, with red indicating a poor match (i.e. a matching score near the failure threshold), and green indicating a good match (i.e. a matching score near 1.0).
Search Areas: When enabled, the search window will be displayed for all selected trackers.
All Tracker Paths: When enabled, tracker paths will be displayed in the main window.
Tracker Names: When enabled, tracker names will be displayed in the main window.
Tracker Info: When enabled, tracker info will be displayed in the main window for all selected trackers.
Only Selected: When enabled, only selected trackers will be displayed in the Cinema window.
Upstream trackers: When enabled, all upstream trackers will be displayed in the Cinema window.
Marquee: When enabled, the left mouse button can be used to draw a selection marquee in the Cinema window to select trackers. Holding the Ctrl key whilst drawing will ensure that previous selections are kept. Holding the Shift key will allow a lasso selection to be used instead of a rectangle.
Centre View: When enabled, the image displayed in the Cinema window will be translated so that the first selected tracker is positioned in the centre of the window. This can be useful when checking the motion of one particular tracker to see how well it manages to track an image feature over multiple frames.
Reference View
When placing trackers in multiple clips, the Cinema window can be split into two parts, with the right-hand part used as a reference to help when placing trackers. The clip shown in the left part of the split is referred to as the Primary Clip, and the clip on the right as the Secondary Clip.
All interaction, in terms of placing and editing trackers, occurs on the Primary Clip, with the Secondary Clip only used as a reference.
Example ASCII tracker text file
# "Tracker Name"
# clip number
# frame count
# frame, xpos, ypos, matching_score

"Tracker0001"
1
4
15 506.41 320.16 1.0000
16 407.83 318.54 0.9956
17 406.44 315.12 0.8854
18 404.22 311.14 0.8774

"Tracker0001"
2
3
66 861.22 196.44 0.9964
67 882.34 185.33 0.9451
68 876.11 179.44 0.9132

"Tracker0002"
1
5
11 274.11 776.34 1.0000
12 277.73 781.45 0.9951
13 281.16 783.44 0.8873
14 285.11 791.62 0.9312
15 288.76 794.12 0.8901
Default Keyboard Shortcuts
Default keyboard shortcuts are listed in the Keyboard and mouse section.