| PFTrack Documentation | Node Reference |
Auto Track
Usage | Tracker adjustment | Tracking parameters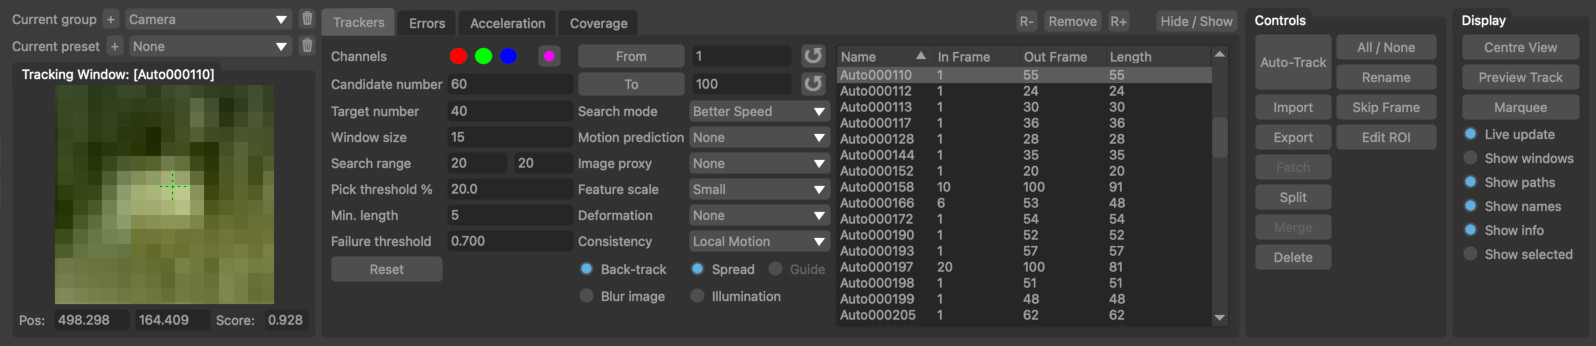
The Auto Track node can be used to automatically generate trackers to use for camera or object solving, and has a single input and output. It attempts to pick suitable points in each frame and match them together to form a set of connected feature tracks.
The Auto Track node is designed to work best with features picked from natural images, such as marks on a wall, or stone or fabric texture for example. For scenes containing more synthetic features such as large tracking markers on a green-screen set, the User Track node can be used for more manual control of exactly where the trackers are generated.
Usage
The Auto Track node works by first identifying a large number of candidate points in each frame, and matching those points from frame-to-frame over the entire clip. Once the candidate points have been matched, they are filtered down into a smaller set of trackers which are then passed down-stream.
The trackers are chosen so that they best represent the overall contents in the shot, exist for a large number of frames, and are well distributed over the image area. The number of trackers that are generated can be adjusted interactively without the need to re-generate all the candidate points each time, greatly speeding up the process of selecting suitable parameters for a shot.
Clicking the Start Tracking button will start the tracking process.
After trackers have been generated, their image motion and tracking length are presented in the Tracker Motion and Tracker Length graphs respectively. Further information about these tools is available below.
Trackers can also be selected in the Cinema window by clicking with the left mouse button. Multiple trackers can be selected by holding the Ctrl key whilst clicking.
Candidate Points
Candidate points in each frame are selected by looking at the image data and identifying areas that correspond to strong features such as corners or image texture. The number of candidate points that are then selected for matching in each frame is controlled by two main parameters in the Parameters panel:
- The Feature Scale value determines the overall scale of features that examined. When this is set to Small, small corners and image texture regions will be used. Large means larger scale features will be selected. Looking for features at a larger scale can be beneficial in situations where image noise or other factors have a detrimental effect on the selection of candidate points, but may reduce the overall accuracy of the solve as large points can be more difficult to locate precisely in other frames.
- The Feature Confidence value controls the number of points in the image that will be considered for tracking. A larger value means only the features with a high confidence will be used. A lower values means features with a lower confidence will be picke dand tracked, although these features may not track as accuractely as those with a high confidence.
- The Motion Prediction parameter defines the technique used to predict how points are moving from frame-to-frame. The default value of Localized will use the localized image motion as a predictor.
- The Search Area parameters define the size of the search window used when trying to locate where a point moves from one frame to the next. This defaults to a fixed percentage of the image size, but can be reduced or increased if necessary in situations where there is very little or very large amounts of image motion. The search area should be set large enough to ensure features can be matched from frame-to-frame.
Previewing Trackers
To see how the tracking parameters will affect the point that are picked as candidate points, click the Preview Tracking button. This will display dots in the Cinema window that are coloured according to their status:
- Points that have by picked and tracked successfully are shown in yellow
- Points that have by picked for tracking but could not be tracked are show in red
- Points that have not been picked for tracking because their confidence was below the Feature Confidence threshold are shown in purple
For points that are tracked successfully, their motion vector is also drawn as a yellow line. You can also preview the Search Area size for trackers by enabling the Preview Search Windows option and hovering the mouse over a tracking point. Use this to judge whether the search area is too large or too small for your clip.
You can use the preview tool to help adjust the Feature Confidence parameter to ensure enough are picked over your entire image which will help to produce a more accurate camera solve.
Masks
Masks can be generated to restrict candidate point selection to a specific part of the image. This is useful when the clip contains objects moving independently from the camera, and points are being generated for either camera or object tracking.
To mask candidate points, connect either a Mask or Keyer node to the Auto Track node as described in the Workpage section of this documentation, Or load an Image-based mask into the upstream Clip Input node.
Deleting trackers
Individual trackers can be deleted where required (for example, if they have been tracked incorrectly) by showing the Tracker Motion, selecting the tracker (either from the graph or from the Cinema window), and clicking the Delete button.
The Marquee button can also be used to select multiple trackers in the Cinema window by drawing a selection rectangle with the left mouse button. Hold the Shift key to draw a free-hand lasso, or the Ctrl key for multi-selection.
Editing trackers
Adjustments to tracking points can be made directly in the Auto Track node using the Tracker Adjustment tools.
Solver nodes (such as the Camera Solver or Survey Solver, and others) also contain Tracker Adjustment tools that can be used to quickly adjust a tracking point directly in the node and correct tracking alignment issues without changing to another node.
Trackers can also be made available downstream for further editing by attaching a User Track node beneath the Auto Track node, and clicking the Fetch button to fetch individual trackers for editing. See the User Track node documentation for further details.
Tracker Length
The length graph displays information about the number of trackers that have been generated for each frame of the clip. The graph displays a colour-coded count of the number of trackers in each frame:
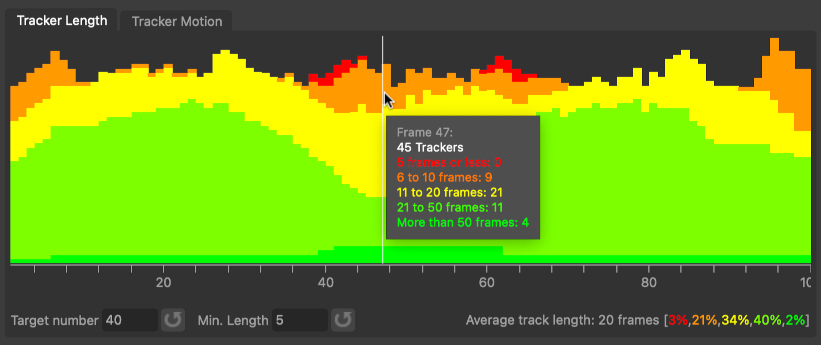
The graph is colour-coded according to the length of each tracker. Trackers that exist for 5 frames or less are coloured red, and points that exist for more than 50 frames are coloured green, with graduations of orange and yellow between.
Below the graph is a numerical breakdown of the overall length of each tracking point, including the average track length, and a percentage breakdown of the entire set of tracking points, colour-coded using the same scheme as the graph.
This graph can be used to quickly identify frames where further attention may be required because fewer features could be tracked, or frames where the number of frames each tracker exists for is small. In these cases, add an User Track node downstream manually tracking additional points.
Target number: The target number of trackers to generate for each frame. Adjusting this value will select more or fewer candidate points to use as trackers.
Min length: The minimum number of frames that each tracker must exist for. Increasing this number will remove short trackers and generate more longer trackers if possible.
Mouse controls
Hovering the mouse over the length graph will display a tooltip showing the statistics for the current frame.
To pan the graph horizontally, click and drag with the Right mouse button. To zoom, click and drag with the Middle mouse button (these buttons can be changed in the User Preferences window). Alternatively, the mouse wheel can be used to zoom as well if desired.
Tracker Motion
The motion graph displays plots for the horizontal and vertical motion of each tracker in each frame. The graph can display either tracker velocity or acceleration by selecting the appropriate option from the menu below the graph.
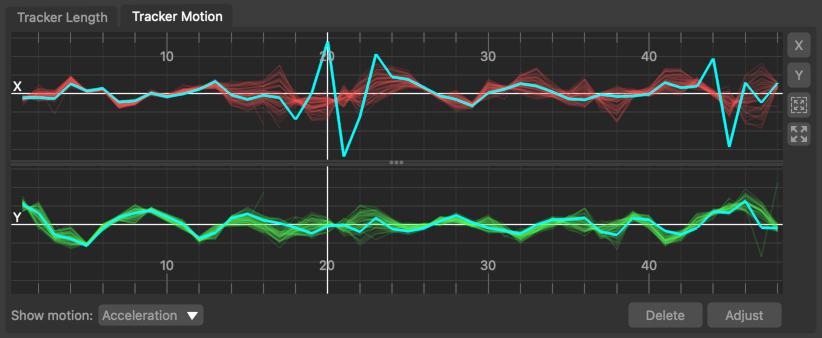
The velocity and acceleration graphs can be used to help quickly identify trackers that are moving differently compared to the rest of the image. For example, this may be because the trackers exists on an object that is moving independently from the camera, or it may be because the tracker is positioned on a false corner, or on another point that cannot be tracked accurately. These situations will be shown as jumps and sharp changes in the velocity or acceleration of the tracker.
Horizontal motion is shown in the upper graph in red, and vertical motion is shown in the lower graph in green. The motion of any selected trackers is shown in blue.
Below the graph is a menu that can be used to switch between displaying tracker velocity or acceleration.
 : Click the X button to display the horizontal tracker motion graph only. Click again to show both the horizontal and vertical graphs.
 : Click the Y button to display the vertical tracker motion graph only. Click again to show both the horizontal and vertical graphs.
 : Click the Fit to area button and draw a rectangle in the graph using the left mouse button to zoom-in on a particular area of the graph.
 : Click the Fit button to fit the graph viewport to show all tracking points and frames.
 : Click the Delete button to delete any selected trackers.
 : Click the Adjust button to adjust the position of the selected tracking point.
Mouse controls
To pan the graph horizontally, click and drag with the Right mouse button. To zoom, click and drag with the Middle mouse button (these buttons can be changed in the User Preferences window). The graphs can be panned or zoomed both horizontally and vertically by dragging the mouse in the appropriate direction.
Alternatively, the mouse wheel can be used to zoom as well if desired. Scrolling the wheel will zoom the graph horizontally. To zoom vertically, hold the Alt/Option key whilst scrolling the wheel.
Tracker Adjustment
![]()
The tracker adjustment buttons appear in the Cinema window when a tracker is selected for adjustment by clicking the Adjust button. The Cinema will zoom in to centre on a closeup of the tracking point.
Whilst zoomed in, the tracker position, window, or search window can be adjusted in the Cinema using the left mouse button.
The default interaction to change the tracker position is click and drag the background image to align with the tracking point.
Alternatively, if you prefer to click and drag inside the tracking window to move to tracker whilst keeping the background image fixed, disable the move background instead of tracker option in the Cinema/Viewer preferences window.
The size of the window (or search area) can adjusted by moving an edge or corner. Hold the Ctrl key to adjust the window asymmetrically.
The Alt/Option keyboard modifier can be held to ensure only the tracker position is changed, regardless of the mouse position. This behaviour can be reversed in the User Preferences window if desired, so the modifier must be held to make any changes to the window or search area.
Controls
The following buttons can also be used to adjust or re-track, and quickly correct any errors:
![]() : Click the In-point button to set the tracker in-point to the current frame.
: Click the In-point button to set the tracker in-point to the current frame.
![]() : Click the Track backwards button to track backwards by 5 frames, starting from the current frame..
: Click the Track backwards button to track backwards by 5 frames, starting from the current frame..
![]() : Click the Track backwards once button to track backwards by 1 frame, starting from the current frame.
: Click the Track backwards once button to track backwards by 1 frame, starting from the current frame.
![]() : Click Hide button to hide the tracker in the current frame, or click Show to re-show it.
: Click Hide button to hide the tracker in the current frame, or click Show to re-show it.
![]() : Click the Track forwards once button to track forwards by 1 frame, starting from the current frame.
: Click the Track forwards once button to track forwards by 1 frame, starting from the current frame.
![]() : Click the Track forwards button to track forwards by 5 frames, starting from the current frame.
: Click the Track forwards button to track forwards by 5 frames, starting from the current frame.
![]() : Click the Out-point button to set the tracker out-point to the current frame.
: Click the Out-point button to set the tracker out-point to the current frame.
![]() : Click the Reset button to reset all tracker adjustments, reverting the tracker back to its original state.
: Click the Reset button to reset all tracker adjustments, reverting the tracker back to its original state.
Nudge keyboard shortcuts
Holding down the Alt/Option modifier key while pressing the Left Right Up Down cursor keys will nudge the tracker position 1 pixel in a direction. The distance a tracker is moved can be changed in the preferences, along with the keyboard shortcuts for each direction.
Additional keyboard shortcuts are available to provide finer-grain adjustments (Ctrl + Alt/Option) modifier keys by default). This reduces the adjustment by a scale factor (0.25 by default) which can be changed in the preferences.
Tracking Parameters
Frame range: The range of frames that will be tracked.
Current preset: The Current preset for all tracking parameters.
 Click the plus button to store current parameters as a new preset. The current preset name can be changed by typing into the menu box.
 Click the trash-can button to delete the current preset.
Channels: Image and mask channels to use for point selection and tracking. Individual channels can be enabled or disabled, and the mask button can be used to define how input masks are used to restrict the area of the image used for tracking.
Feature scale: Scale of features expected in the image. When set to Small (the default value), small-scale corners and image features will be picked and tracked. This will generally provide the best accuracy, but if only larger features exist in the shot (for example, due to focus issues) the using a Large feature scale can sometime help to pick them out more accurately.
Feature confidence %: This value controls the number of points in the image that will be considered for tracking. The default value is 50%. Decreasing this value will mean more points are selected for tracking, but these points may not track as well as others that have a higher confidence rating.
Search area: The width and height of the search area (in pixels) used when attempting to track points in one frame to another.
Feature template: This parameter specifies whether the feature template that is used for tracking should remain fixed (the default), or should change from frame-to-frame as the clip is tracked (Adaptive). A fixed template will generally produce a more accurate set of tracking points, and an adaptive template will often produce longer tracks. However, an adaptive template can also introduce more errors into your trackers that may need further editing.
Refine: This option controls whether an additional refinement process should be performed for each tracker that estimates how the feature template warps from frame-to-frame. Enabling this option will generally produce a more accurate set of trackers, but comes at the cost of a small increase in the time required to track each frame.
Motion prediction: The method used to predict where one feature is moving to in the next frame. The default value is Localized that will use the local image motion to predict how trackers move. Whole Image uses the motion of the entire 2D frame to predict tracker movement. Alternatively, setting this to Using Metadata will use metadata describing approximate camera motion if that is available for the clip (Note: the camera focal length must also be set to a known value to use metdata) . Setting this to None means that no prediction is used, which can often speed up the tracking process but may mean some points are not tracked as accurately.
Reset: Reset the tracking parameters back to their default values.
Edit ROI: Adjust the region of interest (ROI) for matching in the Cinema window. Click and drag with the left mouse button to adjust edges of the ROI. Points outside the ROI will be rejected during the matching process.
Skip Frame: Skip the current frame during feature matching. Once skipped, the button label will change to Un-Skip Frame to include the frame during the matching process. Skipping frames can be useful when one frame is missing or corrupted due to some sort of image degradation.
Start Tracking: Start the automatic tracking process, first tracking candidate features throughout the clip and then automatically filtering them to generate a set of trackers. Holding the Shift key whilst clicking this button will run the tracking process in the background.
Display
Preview Tracking: When enabled, candidate point locations will be displayed in the Cinema window. This can be used to quickly assess how different parameters affect the features before tracking. Hovering the mouse near a preview point will display a numerical readout of the tracking motion to the next frame.
Preview search windows: When enabled, hovering the mouse over a point will also display the Search Window that was used to track the feature into the next frame.
Preview failures: When enabled, candidate features that were not tracked are also displayed in red.
Live tracking in Cinema: When enabled, all the Cinema will be updated whilst tracking is being performed. Disabling this option may increase overall tracking speed.
All tracker paths: When enabled, all tracker paths will be displayed in the Cinema window.
Tracker info: When enabled, pixel coordinate information for each tracker will be displayed in the Cinema window.
Fetched trackers: When enabled, only those trackers fetched into down-stream nodes will be displayed.
Marquee: Select multiple trackers in the Cinema window by drawing a selection rectangle with the left mouse button. Hold the Shift key to draw a free-hand lasso, or the Ctrl key for multi-selection.
Centre View: Translate the image displayed in the Cinema window so that the selected tracker is positioned in the centre of the window. This can be useful when checking the motion of one particular tracker to see how well it manages to track an image feature over multiple frames.
Tracker Groups
All the trackers generated by an Auto Track node will be placed into a single Tracker Group and passed downstream to other nodes. Nodes such as the Camera Solver, Survey Solver, or Object Solver (and others), contain options to choose which tracking groups are used to solve for camera or object motion.
This allows each tracking node such as Auto Track or User Track to be used to create trackers for a single task, such as tracking a camera or tracking a single object. Multiple tracking nodes can be used to generate multiple tracking groups for more complex tasks.
If you wish to change the name of the tracker group generated by the Auto Track node, this change the node's name in the Workpage.
Default Keyboard Shortcuts
Default keyboard shortcuts are listed in the Keyboard and mouse section.