| PFTrack Documentation | Preferences |
System
Workstation | Cache | OpenColorIOWorkstation
The Workstation panel contains information about the CPU and GPU on your machine, as well as other useful information related to the operating system.
CPU Information

The CPU information section can be used to adjust the number of CPU cores being used to run multi-threaded operations in PFTrack. This will default to using All of the available CPU cores, but this can be changed to using the menu and edit boxes if required:
GPU Information

The GPU information section shows all the GPU cards installed in the system. The card used for displaying the PFTrack interface is indicated on the left (1), along with the card assigned for processing operations (2) such as calculating depth maps for photogrammetry.
Further information about how GPUs are used for background processing is available in the Background Processing section.
Clicking the  button will display a popup window with additional information about the graphics card. Selecting the Use for processing option in this popup window will enable the graphics card for processing operations.
Cache
The Cache panel contains information about both the RAM and Disk caches available in PFTrack.
RAM Cache
The RAM Cache section provides control over the memory cache used to speed up playback and processing:

The size of the memory cache is shown on the left. A cache size can specified as a certain number of Mb or Gb for megabytes and gigabytes, and defaults to 50% of physical memory. It can be edited by clicking in the edit box and entering a new value.
The amount of cache used is displayed on the right. Clicking the  button will clear the RAM cache.
Cached frames are shown in green in the the Cinema's scrub bar and photo navigation controls.
Disk Cache
The Disk Cache section contains information about the current disk caches available for use, and controls where new disk cached can be created.
Creating a disk cache
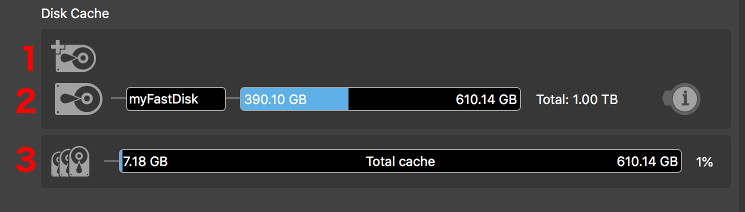
A new disk cache can be created by clicking the  button (1). This will open a file browser where a disk volume and directory can be chosen, and add a new entry to the cache list:

After entering the cache name and pressing the Return key, click the  button to create the cache. Alternatively the operation can be cancelled by clicking the
  cancel.
Managing disk caches
All available disk caches are listed (2), along with their name, the amount of space used on the disk volume, and the amount of space available to use on the right. The total amount of disk in the volume is shown at the far right.
Clicking the  button will display a popup window showing the cache directory and name. The cache name can be edited from here, or the disk cache deleted if required by clicking the Delete button.
The total amount of space occupied by cached media is shown at the bottom in the Total cache indicator (3).
OpenColorIO
The OpenColorIO panel contains settings to help with displaying clips in their intended colour space, such as ACES 2065-1 or ACES CG. This can be useful if you need to expose more image data for feature tracking, or want to bake a colour transform into a clip for preview purposes.
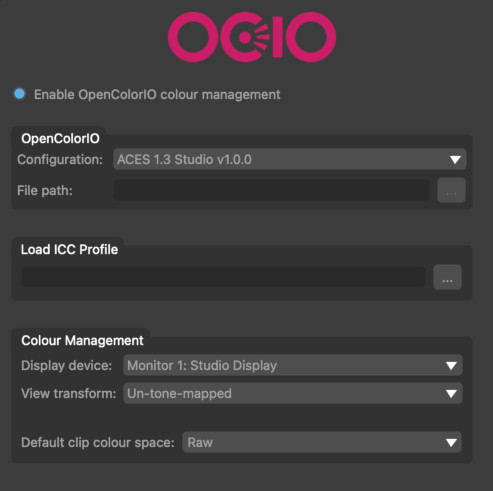
PFTrack uses OpenColorIO for colour management. This can be enabled or disabled globally using the Enable toggle.
OpenColorIO
When OpenColorIO colour management is enabled, a configuration can be chosen using the Configuration menu. PFTrack ships with two ACES industry standard configurations: ACES 1.3 Studio (the default) and ACES 1.3 CG. These each define a diferent set of display devices, view transforms, and colour spaces.
A custom OpenColorIO configuration file can also be used if desired by choosing From File.. from the Configuration menu and clicking the "..." button to browse to locate your ocio file.
When using an ACES 1.3 configuration, monitor colour spaces should be detected automatically on macOS or Windows. They can also be set by loading ICC monitor profiles if necessary.
Colour spaces for individual clips are set in the Clip Input node.
Load ICC Profile
If your monitor colour space is not detected automatically you can load an ICC profile by clicking the ... button. Once added, your device name will appear in the Display Device menu.
Colour Management
Display Device: This is the device on which the image is being displayed. On macOS and Windows platforms this may be automatically detected (provided a suitable OpenColorIO 2 configuration is being used).
View Transform: This defines how the image will be transformed for display on the device. Typically this is used to convert between scene-referred and display-referred spaces, or can be left as the default Un-tone-mapped (see the OpenColorIO documentation for further definitions and details).
Default Clip Colour Space: This defines the default colour space that will be assigned to each clip when it is imported into a Clip Input. This can be set to Raw if no default colour space is desired.