| PFTrack Documentation | Media Management |
File Browser
Native file browser | Embedded file browser | Browsing for media | Storing common paths | Media files | Image sequences |Media preview and loading | Loading photos
The File Browser is opened by clicking the  button in either the Clip Input, Photo Input, or Spherical Input nodes.
By default, PFTrack will open the native file browser for your operating system (for example, Finder on macOS, or Explorer on Windows). PFTrack also has an embedded file browser that operates in a consistent manner over all operating systems. The choice of which browser to use can be made in the User Preferences.
Native file browser
The native file browser is provided by your operating system, and uses the standard network and directory tools you are used to using on your desktop.
If you want to load a sequence of separate image files as a single clip, two options are available to specify which images you wish to load:
- Select the first frame to load by clicking with the left mouse button. Then, holdg the Shift and click on the last frame you wish to load. This will select all in-between frames, and clicking the Open button will load those frames as a single clip.
- Alternatively, if you wish to load all images in your sequence you can do this quickly be selecting a single frame in the sequence using the left mouse button. Clicking the Open button will automatically identify all similarly named files in the sequence and load them as a single clip.
The first method can be used if you wish to load a subset of the images in your sequence, rather than the entire sequence.
If any errors are encountered when attempting to load media using the native file browser (for example, a file is selected that PFTrack does not support), and error message will be displayed.
Embedded file browser
To enable the embedded file browser, switch on the relevant option in the User Preferences. The embedded file browser presents a custom tool to load supported clips and media that operates consistently on all operating systems.
Browsing for media
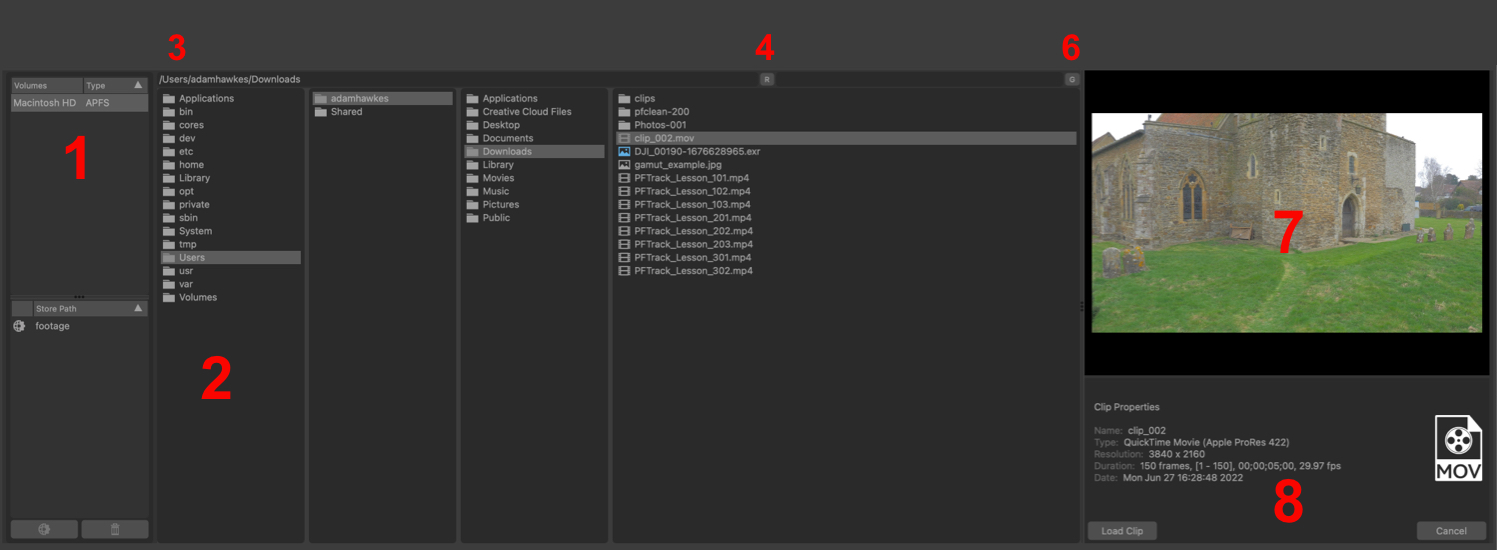
All mounted disk volumes are displayed at the top-left (1), and directory paths (2) in the central columns. Clicking on a directory with the left mouse button will open it in another column to the right, showing all relevant files and sub-directories.
Alternatively, a path may be typed in to the path text entry (3) above the directory listing columns.
If the contents of a directory change whilst it is being viewed in the File Browser (e.g. new clips added or a sub-directory removed) then these changes are not automatically picked up. Clicking the Refresh button (4) will rescan the current directory and pick up any changes.
Note that UNC paths are not supported, and network disks must be mapped to a drive letter.
Storing common paths
To store a directory path for use later, click on the directory name with the left-mouse button and drag-and-drop into the Store Path list (5). This will store that path for quick recall.
Clicking on an item in this list jumps directly to that path in the File Browser. Double clicking on a item allows the entry to be renamed if required. If the path name is shown in red, this indicates it can no longer be read from (e.g. a network drive may no longer be mounted).
The  icon indicates whether the saved path is available to all projects. When this icon is not present the path is only stored for the current project. This can be toggled by using the corresponding button.
Clicking the  button will remove the selected path from the list.
Media files
Media is identified by scanning a directory's contents to find file names which form numbered image sequences. Additionally movie file formats such as QuickTime and Media Foundation are also supported on macOS and Windows respectively.
Media is sorted in alphabetic order based on their name. Each item in the directory listing column list has an icon to show its type. These icons are:

Image sequences
If files in an image sequence comprise just a frame number such as:
0170.exr
0171.exr
0172.exr
...
then the name of the media clip is taken from the parent directory. Sequences like this can still be used without problem in PFTrack, and can even be later renamed for user convenience (this renaming just alters the displayed name within the application and does not touch the files on disk).
If the sequence of file names has a break in it, e.g.
footage.001.exr
footage.002.exr
footage.003.exr
footage.005.exr
footage.006.exr
then there is the ambiguity about whether this should be a single clip with frame number 4 missing (which will possibly exist at a later date) or two independent clips with frame ranges 1-3 and 5-6. This ambiguity is resolved by clicking the  button above the directory columns (6). This will toggle between displaying a single image sequence with a missing frame, or separate sequences.
Media preview and loading
Clicking on a file will display the media in the preview window (7), along with useful information about the selected file (8).
Moving the mouse into the media preview window displays simple playback controls - a stop/start playback button and a timeline to show current frame. Clicking and dragging with the left mouse button in the timeline allows you to quickly navigate through the media.
To load the selected media, click the Load Clip or Load Photos button. Alternatively, to close the file browser click the Cancel button.
Loading photos
When loading photos using the Photo Input node, individual files are grouped according to image resolution and any identifying camera and lens EXIF metadata when available.
The button above the directory columns (6) controls whether the structure of the filename also affects grouping. When this button is enabled, photos will be grouped according to the similarity of their filename and metadata. When not selected, only metadata will be used to group files.